ECS - Jobs & Job Component System (Part 5)
- Richard Bradley
- Aug 19, 2019
- 19 min read
Updated: Sep 18, 2019
Job Component System
A JobComponentSystem allows your game to take advantage of all your available CPU cores by creating a working thread per core, therefore eliminating the cost of context switching. Unity also automatically takes care of race conditions so a lot of the hurdles of multi-threaded programming are taken care of for you
Typically a system will operate on a set of entities that 'contain' specific components. The JobComponentSystem uses an EntityQuery to find the entities that match the query then iterates over them.
The code snippet below shows a basic template for a JobComponentSystem, including all available life-cycle methods. The Job section I will explain later in this tutorial, at this time you should focus on the system section.

The Safety System
The C# Job System solves race conditions by sending each job a copy of the data it needs to work on, this means that no job has a direct reference to the data on the main thread. This safety system feature prevents race conditions by ensuring that a job is not writing directly to the main threads data while the main thread is in the process of reading said data.
A drawback to this safety system feature is that each jobs results are contained within their own individual copy of the data, isolating them.
Luckily Unity ships with Native Containers, a kind of shared memory that allows jobs to access data that is shared with the main thread.
Native Containers
Native Containers allow data to be shared between jobs and the main thread; the safety system is also supported by all Native Containers types and tracks what is reading and writing to them. This can be manually disabled by implementing the [NativeDisableContainerSafetyRestriction] attribute.
Below is a list of the available Native Container types.
NativeArray (Array of native memory to managed code)
NativeList (resizable NativeArray)
NativeHashMap (key and value pairs)
NativeMultiHashMap (multiple values per key)
NativeQueue (FIFO Queue)
A Native Container can also be useful with job dependencies (discussed later), as one job can write to a Native Container and another job can safely read that 'same' data after the first job has finished.
When a job has access to a Native Container, by default, it will have read and write access. If you have two jobs that are going to write to the same Native Container, the C# Job System will 'not' allow the second job to be scheduled whilst the first job is writing to it. This can effect optimal performance as one job is waiting for another.
If you know that multiple jobs only need to read from a particular Native Container it is good practice to mark this container with the [ReadOnly] attribute (discussed in more detail later). This will permit the C# Job System to schedule the aforementioned jobs allowing them to read the Native Container at the same time.
Below is an example of how to declare a NativeArray container, marked with the [ReadOnly] attribute.

When creating a NativeArray you can specify it's length along with the type of memory allocation required, via an Allocator enum.

There are currently three Allocator types for Native Container memory allocation/release.
Allocator.Temp - Fastest allocation, with a lifespan of one frame or less. Don't pass to jobs.
Allocator.TempJob - Slower allocation, with a lifespan of four frames or less, thread-safe.
Allocator.Persistent - Slowest allocation, with a persistent lifespan, don't use when performance is of the essence.
As Native Containers are not managed memory they will 'not' be automatically cleaned up by a garbage collector. If the garbage collector is 'not' freeing the memory up, then we have to do it.
Luckily a Native Container supplies a Dispose method for our convenience. When this method is called it will dispose of the memory owned by the Native Container.

Alternatively you can tag a Native Container with the [DeallocateOnJobCompletion] attribute which will automatically call the Dispose method when the job completes.

Jobs
A job system receives units of work called jobs and runs them in parallel and concurrently on the CPU cores working threads.
Job systems place jobs into a job queue, worker threads then take jobs from this queue and executes them. The job system manages job dependencies, ensuring that the aforementioned jobs execute in the correct order.
How To Create Jobs
A number of different IJob interfaces can be used to define a job, most job signatures specify what components this job can read/write to. The list below will give you an idea of the IJob interfaces available.
IJob
IJobChunk
IJobForEach
IJobForEachWithEntity
IJobParallelFor
IJobParallelForBatch
IJobParallelForDefer
IJobParallelForDeferExtentions
IJobParallelForExtentions
IJobParallelForFilter
When creating any job, you must first declare a struct that implements one of the aforementioned interfaces. In this case we will be implementing the IJob interface which allows you to schedule a single job that runs in parallel to other jobs.
Here I have created a struct named Job1 and inherited from the IJob interface, using VS Code to automatically implement the interface's Execute method.

This Execute method is where this jobs work is done and is invoked by a worker thread once this job has been scheduled.
Like any struct you can also include fields in a job, however, these fields must be of blittable type or a Native Container, as shown below.

How To Schedule Jobs
IJobExtensions exposes a Schedule method which allows you to schedule a job on the main thread. When you schedule a job it is placed into a job queue for execution at a later time; its also worth noting that you can 'only' call the Schedule method from the main thread.
Before we schedule a job, lets first instantiate the Job2 example from above and populate its data.

Now we have a viable job to schedule, all we have to do is call the Schedule method on our new job.

This will add myJob to the job queue; worker threads will then take jobs off this queue to operate on.
When using the Schedule method it returns a JobHandle which you can use to reference your job for various operations, such as checking whether the job has completed or not. We store this JobHandle in the the myJobHandle variable, so we can use it later.
A JobHandle has functionality to make sure that the main thread does 'not' continue executing until this job has completed. To do this you simply call the JobHandle.Complete() method, when this method returns the main thread can continue executing. This is a blocking operation, however, it can prevent a new job from being scheduled while the old one is still running.

You can also use JobHandle.IsCompleted to perform some logic once the job has completed.

In this tutorial I usually complete the job directly after scheduling it, which is 'very' bad practice. I do this for learning purposes only and do not suggest you follow suit.
The reason it is bad practice is because ideally you should schedule early and complete later in the frame (you could even wait until the next frame to complete the job). This gives the main thread some breathing room as it no longer has to immediately wait for the job to complete. If you complete the job later in the frame its results 'may' be ready for the main thread, therefore when the main thread needs the results they are already there, no waiting required.
If you look at the Unity profiler and see a wait on the main thread, first see if you can schedule the job earlier or complete later, as the job may not be finishing quickly enough for the main thread.
Job Dependencies
You may wish to create jobs that are dependant on one another, for example, Job1 may prepare data for Job2 to process; this is known as a job dependency. Thankfully jobs support dependencies and in this scenario the job system would ensure that Job2 is only run once Job1 has completed.
Using all we have learned so far I am going to show you a simple example of a job dependency within a JobComponentSystem.
In this example we will have two jobs.
Job1 will multiply two float values together and store the results in a NativeArray.
Job2 will display the results of that NativeArray after Job1 has finished.
Let's see how we can achieve this.
We first create a JobComponentSystem named DependencyDemo_System.

Now we need to add the fields that this system will use.

The NativeArray called results will be shared between both jobs so that Job1 can populate it and Job2 can read from it.
Both currentIndex and maxIndex inform both jobs which NativeArray cell to work on and how many cells are available (This will make more sense later on).
Now we need to create Job1 which we will call MultiplierCalculationJob. This job will be responsible for taking two float values, multiplying them together and then storing them in the correct cell of our NativeArray.
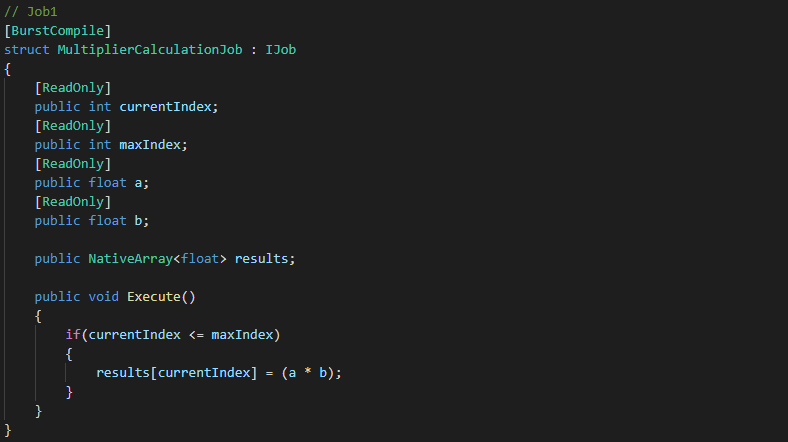
Note how currentIndex, maxIndex and results match the fields we declared in our JobComponentSystem, our OnUpdate method will pass this data to the job on instantiation (more on this later).
What you should really focus on at the moment, is the fact that both a and b get multiplied together and stored in the relevant results[currentIndex] cell.
Lets now move onto Job2.

This job does not need the a and b variables from above because it will be working on the already computed values stored in our NativeArray by Job1.
What it does need though is a reference to the shared data (results) plus the currentIndex and maxIndex values, which its execute method uses to display the output (In this case Debug.Log).
Note that accessing statics from within a job is not advisable as it circumvents all safety systems. This is for demonstration purposes only (I had to remove the [BurstCompile] attribute to allow Debug.Log to function).
Now we have our two jobs ready to roll, we need to initialise our JobComponentSystem variables. I have done this with the OnCreate life-cycle method supplied via the JobComponentSystem.

Here we initialise our NativeArray (results) to have 20 float cells, with persistent memory allocation (Slowest allocation, with a persistent lifespan).
We also initialise our currentIndex value to 0 (starting index) and maxIndex to the length of our results NativeArray minus 1 (giving us 19, which represents the max cell index available in our NativeArray).
Now our JobComponentSystem fields have been initialised we can move onto the heart of this example, the OnUpdate method.

The red highlight shows the creation of Job1 and the data we populate it with. We send the currentIndex and maxIndex values so this job knows what NativeArray cell to work on. Then we supply two random float values for this jobs a and b fields to use for its multiplication functionality. Lastly, we send a reference to the (results) NativeArray so this job can store it's result in the relevant cell.
With the blue highlight we create Job2 and send it the exact same data, minus the a and b variables from above, because they are not required. The result of a and b should have already been stored in the included (results) NativeArray.
Now to the important part of this example, the yellow highlight, it's here that we schedule our job. Note that when scheduling Job2, we also pass it the JobHandle from Job1; what this does is sets up a job dependency, ensuring that Job2 will only run once Job1 has completed.
We then take the jobHandle from this scheduled job and ask it to Complete, which forces the main thread to wait for this job to finish before continuing.
Finally, within the pink highlight, we increment our currentIndex variable (so that it is ready for use when the next job is created) and return our jobHandle.
The OnStopRunning life-cycle method is used to Dispose of our NativeArray (as its not managed by the Garbage Collector) when this system stops running.

That it, lets see the results.

Admittedly its not the most beautiful output I have ever seen, but i'll take it.
JobHandle.CombineDependencies, allows a job to have multiple dependencies. The dependencies tied to this job must finish before the job is scheduled and executed.
Below is an example of how to use JobHandle.CombineDependencies to combine two dependencies (jobHandle1 and jobHandle2). The returned JobHandle is then used as a dependency for job3 when scheduling.

That's it, job3 will now wait for both job1 and job2 to finish before scheduling and executing.
You can also feed a NativeArray full of JobHandles into the JobHandle.CombineDependencies method.

How To Create Other IJobs
IJobForEach
The following code is a basic example of a JobComponentSystem called NewJobSystem which uses a IJobForEach interface when creating a job.

The first thing to note is that jobs can be optimised by utilising the burst compiler, to do this simply add the [BurstCompile] attribute before the job declaration.
The declared struct (NewJobSystemJob) is the job that this system will create, configure and schedule.
The public fields named jobField and currentRotation are what this job needs in order to complete its work.
The Execute method is where the work on each entity is performed, in this example we are simply incrementing each entity's translation.Value.y by the value stored in jobField (1f). We also store the rotation quaternion in the currentRotation field (the reason for this will become clear later on).
The OnUpdate method is where a new job is created, configured (because it runs on the main thread you could add Time.deltatime to the jobField instead) and scheduled.
If you want your job to operate solely on entities that contain a certain component then you can add a [RequireComponentTag(typeof(T)] attribute above the job declaration, where T is the required component. Likewise you can operate exclusively on entities that exclude a particular component by utilising the [ExcludeComponent(typeof(T)] attribute.
Below the ExcludeComponent and RequiredComponentTag attributes are being used in tandem so that the job operates exclusively on entities that contain Alive, Translation and Rotation components. Conversely the job will not operate on entities that include a Dead component.

Both [ReadOnly] and [WriteOnly] attributes can be added to the Execute method of a job to help identify read-only and write-only components. This allows the job scheduler to efficiently schedule jobs; the job scheduler will not schedule a job that writes to a component at the same time another job is reading from it. However, if two jobs are reading from the same component then the job scheduler will schedule the jobs, running them in parallel.
As the currentRotation field only reads from the rotation component this makes it a perfect candidate for the addition of a [ReadOnly] tag, as shown below..

The order in which the ECS run-time executes systems is decided based upon which ComponentSystemGroup they belong to. To place a system in a group you can use the UpdateInGroupAttribute; if you do not place a system in a group explicitly then the ECS run-time will automatically place it in the default SimulationSystemGroup.
You can also control the system update order by using a UpdateAfter(typeof(T))] (where T is the system) attribute. Doing this tells Unity ECS to run the current system after another system has finished, as highlighted below.

Likewise you can tell Unity ECS to execute the current system before another system has run, highlighted below.

If you don't want Unity ECS to automatically run your systems at run-time then you can use a [DisableAutoCreation] attribute which will disable this functionality, allowing you to create and run the systems of your choosing via a Bootstrap script.
Highlighted below is an example of how to add the aforementioned attribute.

IJobForEachWithEntity -
A job utilising IJobForEachWithEntity behaves in exactly the same way as an IJobForEach job with the notable exception being, two added parameters in the Execute method.
As can be seen below, the Execute method's signature introduces entity and index parameters which allows access to the current entity object and its corresponding int index. This index is used to access the parallel component arrays associated with this entity.

There are a couple of issues with manipulating entities within a job:
You can't access the EntityManager within a job, therefore limiting your interactions with the current entity.
If you do access the EntityManager to create an entity or add a component then all injected arrays and component groups would be invalidated.
Thankfully these issues can be overcome by use of a EntityCommandBuffer.
An EntityCommandBuffer can be used to queue up commands that are later run on the main thread. This functionality helps to alleviate the two aforementioned issues with entity manipulation, as a job can now queue up, for example, add/remove component commands which are later applied to the entity (the next time the EntityCommandBufferSystem runs).
An EntityCommandBufferSystem is a sync-point which can hold one or many EntityCommandBuffer's, these buffers are invoked when the EntityCommandBufferSystem next gets updated and are available for all jobs to use.
When a world is initialised each of the three accompanying Default System Groups (Initialisation, Simulation and Presentation) come already equipped with two EntityCommandBufferSystem's for us to use. Below I have made bold all the EntityCommandBufferSystem's that are automatically available to us in each of the three Default System Groups. Note how each of the EntityCommandBufferSystem's are run at the start or end of a groups life cycle; ECS default systems and our custom systems are run between these two EntityCommandBufferSystem's.
InitializationSystemGroup (updated at the end of the Initialization phase of the player loop)
- BeginInitializationEntityCommandBufferSystem
- Invoke ECS Systems
- Invoke Custom Systems
- EndInitializationEntityCommandBufferSystem
SimulationSystemGroup (updated at the end of the Update phase of the player loop)
- BeginSimulationEntityCommandBufferSystem
- Invoke ECS Systems
- Invoke Custom Systems
- EndSimulationEntityCommandBufferSystem
PresentationSystemGroup (updated at the end of the PreLateUpdate phase of the player loop)
- BeginPresentationEntityCommandBufferSystem
- Invoke ECS Systems
- Invoke Custom Systems
- EndPresentationEntityCommandBufferSystem
The code below will demonstrate how to use one of these EntityCommandBufferSystem's to create a EntityCommandBuffer; with this buffer we will queue up AddComponent commands for each entity.

The red highlight declares a private field (beginInitializationCBS) of type BeginInitializationEntityCommandBufferSystem which will be used to cache our EntityCommandBufferSystem.
The InitializationSystemGroup runs the BeginInitializationEntityCommandBufferSystem before any other systems in that group are run.
When the BeginInitializationEntityCommandBufferSystem is run, any created EntityCommandBuffer's are also invoked, its at this time any queued commands are played back.
The OnCreate method, highlighted in green, gets and caches our EntityCommandBufferSystem.
Because we declared beginInitializationCBS as a BeginInitializationEntityCommandBufferSystem, we will retrieve said system. If we declared the beginInitializationCBS variable as a EndInitializationEntityCommandBufferSystem type instead, then we would cache that EntityCommandBufferSystem.
When creating a job in our systems OnUpdate method, we use our beginInitializationCBS variable to create a command buffer (pink), passing it to our jobs commandBuffer field (yellow). Our job can now use this commandBuffer field to queue up commands for play back during the invocation of the EndInitializationEntityCommandBufferSystem.
The blue highlight shows how we can queue up AddComponent commands, in this case we are adding a DamageComponent to each entity this job runs on. Note that Unity will throw the following error message.

This happens because once we have added the DamageComponent to a specific set of entities we are then feeding them back in again for the same treatment. To fix this we could declare a [ExcludeComponent(typeof(DamageComponent)] attribute ensuring that this job will not operate on entities associated with a DamageComponent.
Now we just need to cache the new job handle ready to return for scheduling (purple). In this case we are using ScheduleSingle which runs the job on a single thread.
Lastly, the grey highlight shows how AddJobHandleForProducer is used to tell the EntityCommandBufferSystem which jobs its needs to complete before playing back the commands.
If instead of using ScheduleSingle we decided to use the Schedule method, then the system would process the entities with parallel jobs. Concurrent command buffers should always be used when dealing with parallel jobs; to achieve this we would need to use EntityCommandBuffer.Concurrent, as shown below.

As you can see a lot of the changes are self explanatory, however, it is worth noting that the EntityCommandBuffer.Concurrent struct requires a jobIndex parameter be passed to its member methods. This parameter is used to deterministically playback the recorded commands; a jobIndex should be unique for each job
Below is a code snapshot of the EntityCommandBuffer.Concurrent struct.

IJobParallelFor
Generally when scheduling a job like IJob, there is only one job doing just one task. IJobParallelFor allows the job to run on multiple cores in parallel, each handling a segment of the work.
IJobParallelFor uses a Native Container for its data source, allowing us to carry out the same independent operation on each element over a specified number of iterations.
IJobParallelFor is similar to IJob in behaviour but rather than using just one Execute method it invokes its Execute method once per element in our Native Container.
In order for the worker threads to know which element of the Native Container to work on, the Execute method includes an index integer as its sole parameter. Once the job has been scheduled, its Execute(int index) method will be invoked by worker threads in parallel; once for each index of our Native Container, in no guaranteed order.
Lets jump in and create a ParallelMultiplierJob, first lets create the class declaration.

Now we need to create the job.

We create three NativeArray<int>, two will store a collection of integer numbers (a and b) while the third (results) will be used to store the result of multiplying each element of a and b together.
Now our job is ready we can move onto the OnUpdate method.

We instantiate our three NativeArray's in the red section, giving them a length of 20.
In the blue section we populating both ArrayA and ArrayB with random integers, ready to be multiplied together, element by element.
We then create our job in the green section, making sure to inject the aforementioned NativeArray's into their corresponding job fields.
When scheduling our job in the purple section, we pass in the length of our ArrayResults and a standard innerloopBatchCount of 64, storing the job handle in the variable multiplierJobHandle. We then use this JobHandle to call the Complete method on our job.
When the job has completed the yellow section will then iterate through the ArrayResults, displaying them to the Unity console via Debug.Log.
In the gray section we Dispose of ArrayResults freeing up the memory. The reason we free this NativeArray manually as opposed to using the [DeallocateOnJobCompletion] attribute is because we needed this data 'after' the job had completed in order for the yellow section to function. Finally, we return the multiplierJobHandle.
When running this system in Unity, we get the following output.

Now lets look at the Unity profiler to see our beautiful parallel processing in a visual format.

Welp, I don't know about you, but that looks like a hell of a lot of idles, whats going on here?
Lets do some investigation into the innerloopBatchCount (64) we used when scheduling our job.

In the official Unity documentation it states the following regarding batch size (innerloopBatchCount).
When scheduling ParallelFor jobs, the C# Job System divides the work into batches to distribute between cores. Each batch contains a subset of Execute methods. The C# Job System then schedules up to one job in Unity’s native job system per CPU core and passes that native job some batches to complete.
To optimise the process, you need to specify a batch count. The batch count controls how many jobs you get, and how fine-grained the redistribution of work between threads is. Having a low batch count, such as 1, gives you a more even distribution of work between threads. It does come with some overhead, so sometimes it is better to increase the batch count. Starting at 1 and increasing the batch count until there are negligible performance gains is a valid strategy.
Luckily Unity also supply's a lovely little diagram that helps visualise the above.

Armed with this new found knowledge, lets reschedule our job with a batch count of 1, 2, 4 and 8 to see what outcomes we get.


Well these are certainly more promising, multiple cores are engaged, with a batch count of 8 giving us the best performance in this scenario.
As stated above by Unity, its a valid strategy to play around with the batch count value, starting from 1 and incrementing until you get the best performance verses core usage.
IJobChunk
To iterate through your data by chunk you will need to use an IJobChunk job. When using IJobChunk the JobComponentSystem will call the jobs Execute method once per chunk, with each chunk containing the relevant entities and components that you wish to process.
In order to obtain a unique collection of chunks and entities for this system to process you will need to use one of the following query's.
EntityQuery - Is the most basic query in ECS and allows you to query for specific components within all archetypes, selecting all associated chunks that contain said components. It's important to iterate that the query will select all archetypes that 'contain' the required components, meaning that if additional components are present within the archetype they will still be selected for processing.
Below is a quick look at how to implement an EntityQuery in code.

The first line of code simply declares an EntityQuery variable in readiness to store our query.
In the OnCreate method we use the ComponentSystemBase classes GetEntityQuery method to query for 'all' archetypes that contain 'both' Translation and MoveSpeedComponent types. This query is then stored in our entitiesToMoveQuery (EntityQuery) variable.
Note that ComponentType.ReadOnly is used when specifying the MoveSpeedComponent so the system knows 'not' to write to this component.
And that's it, simples.
EntityQueryDesc - Allows you to specify a more complex, flexible query that can be used to fine tune your archetype selections via the following three optional parameters.
All - All components must exist in this archetype.
Any - At least one component must exist in this archetype.
None - None of the components can exist in this archetype.
The following code shows how the aforementioned options can be used to select archetypes that contain both Translation and MoveSpeedComponent types, but rejects archetypes that contain a Dead component.

This time in the OnCreate method we declare and create a new EntityQueryDesc instance in which we feed in the component types we wish the archetypes to contain (All). Additionally we also feed in the component type we wish the archetypes to exclude (None), in this case, the fictitious Dead component.
Finally we use the GetEntityQuery method again but this time we pass in our query variable as an argument. And that's it, the entitiesToMoveQuery will now encapsulate our more 'complex' query which rejects any archetypes that contain the Dead component.
Now we have a selection of chunks and entities to work with, lets look at some code to define our IJobChunk job.

As you can see this is similar to any other job in that it has an Execute method and public fields for supplying data which the job uses. What is different though are the parameters contained within the Execute method and the strange ArchetypeChunkComponentType fields, what is that all about?
Lets start with the ArchetypeChunkComponentType fields.
To gain access to specific component arrays within a chunk (which is passed to the jobs Execute method) an ArchetypeChunkComponentType variable must be declared for 'each' component type the job needs access to. As per other jobs, the system will assign the values to these ArchetypeChunkComponentType fields in its OnUpdate method.
Within the jobs Execute method an ArchetypeChunk argument (chunk) is included; this object signifies a chunk of memory that contains the entities and components to be processed in this iteration. As a chunk can only contain one archetype it is a guarantee that all entities will have the same set of components. This ArchetypeChunk object exposes the following method.

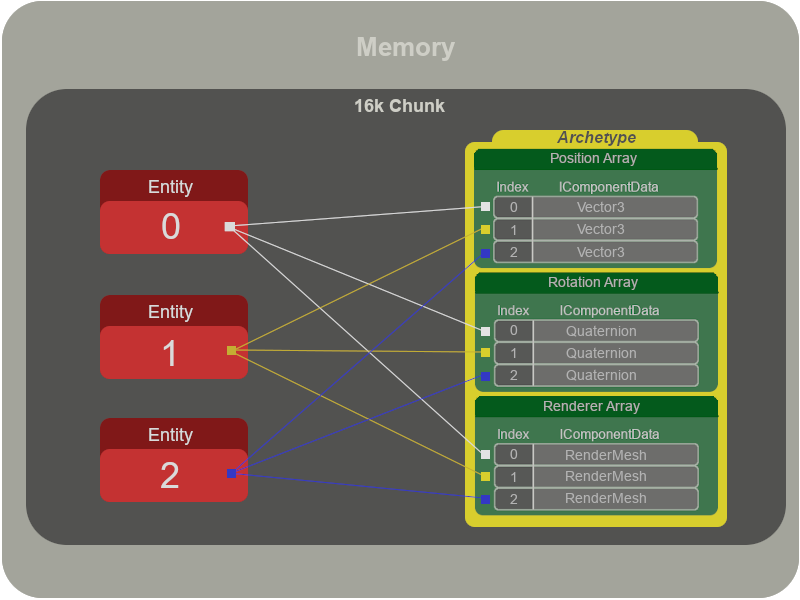
This method takes a ArchetypeChunkComponentType object and returns the NativeArray instances of the specified components in this chunk. We use this function in the first two lines of our Execute methods code to extract the required components in NativeArray form. Visual example below.

An ArchetypeChunk object also exposes a Count property which signifies the number of entities stored within this chunk. With a for loop, we use this Count property to loop through each of our entities, changing their y translation value.
That's if for our IJobChunk job, next lets look at the code for our OnUpdate method.

Like all previous OnUpdate functions within a JobComponentSystem, we create an instance of our job, set the fields and then schedule it. The change to note here is that we use the EntityManager's publicly exposed GetArchetypeChunkComponentType method to get type registry information for our required component. This method returns a ArchetypeChunkComponentType which is then passed to our new job via its relevant ArchetypeChunkComponentType field.
The last line of code simply schedules the job, passing in our EntityQuery (entitiesToMoveQuery) as the first argument.
And that is it. 'If' you have already create a number of entities that are associated with an archetype containing Translation, LocalToWorld, RenderMesh and MoveSpeedComponent's (see here for details of how to do so) then the above code snippets will move the entities in an upwards (y) motion at a specified speed via chunk iteration.
Pretty cool stuff.
Phew, as Yoda once said, "a long slog has this tutorial been" and he's not wrong either. But on the plus you have now completed my ECS tutorial. I hope that this has been, at the very least, of some use to you and allows you to dive into ECS with a little more understanding of it's workings.
But i'm not finished yet..
As ECS is still in preview updated versions can (and will) change, making tutorials out of date and authors of of said tutorials cry in pain and despair. Hence why I have decided to create a final tutorial in this series (yay i hear you cry).
Below is a link to a tutorial I have deemed to be the other considerations of ECS. In this tutorial I will explain tips and tricks within ECS including information I felt was out of the scope of the individual tutorials. Most importantly though, it will also be a temporary landing pad for any changes that take place within ECS as it approaches full release. Any changes will be noted here before I go through the process of updating the individual tutorials effected, so it should be a handy tutorial to pop back to over time.
Until next time.
References

Comments