Linear Interpolation Tutorial
- Richard Bradley
- Jun 21, 2019
- 6 min read
Updated: Aug 13, 2019
So what is Linear Interpolation (often known as Lerp)?
Well if you look at the definition on https://en.wikipedia.org/wiki/Linear_interpolation, you will be presented with an answer like this.
Thankfully a more user friendly answer can be found on https://learn.unity.com/tutorial/linear-interpolation (which is a great tutorial on Unity's available lerp functions)
Ok, well this certainly makes more sense.
So, if we have two numbers 0 and 10, then take a value that is 50% between them both, we would end up with the number 5.
Question : Great, amazing, but what use is this to me?
Answer : A lot, especially when 'time' is added into the mix.
So what do I mean by time? What I really mean is the 'changing of the percentage over time'.
Taking the values of 0 and 10 from above, if we started off a lerp at 0% and then added 10% every update loop (time), we would end up with the following set of values:
(0%) = 0.
(10%) = 1.
(20%) = 2.
(30%) = 3.
(40%) = 4.
(50%) = 5.
(60%) = 6.
(70%) = 7.
(80%) = 8.
(90%) = 9.
(100%) = 10.
Being able to lerp from one value to another over time is used frequently in computer games, it's main use being the movement of an object from one position to another. However, there maybe times when you will use lerp without the use of time, finding the value (n) percent between two numbers can be of use (I use this for my prediction power marker in QBall). Without a doubt though, lerp really shines when time is added into the equation.
Question : So how do we use this within C#/Unity?
Answer : There are plenty of functions which Unity supplies such as Mathf.Lerp and Vector3.Lerp (to name but two) which can be used for your linear interpolation enjoyment.
Below is an example code snippet showing the use of Mathf.Lerp:
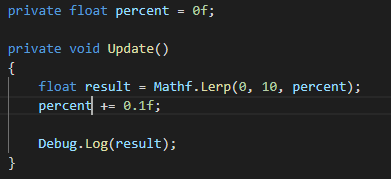
First we create a float field called percent and set its value to 0 (signifying 0%).
Then in a mono behaviour Update loop we create a float named result which is used to store the value returned by Unity's Mathf.Lerp method.
Within the Mathf.Lerp method we input three arguments, 0 (start value), 10 (end value) and our percent variable, which must be a value between 0-1 (0% to 100%).
Once we have stored the result from Mathf.Lerp, we then increment our percent variable by 0.1 (10%)
And the last line of code simply prints out the results to the Unity console.
Here is the output:
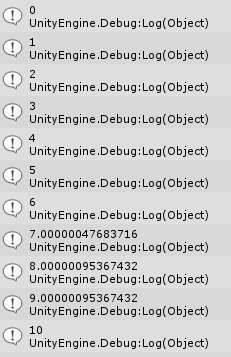
As you can see, the values count up from 0 to 10.
Each update loop the Mathf.Lerp method is called and supplied an increased percent value (in our case a 10% increase) which in turn results in a different return value.
Question: But why are 7, 8 and 9 not whole numbers?
Answer: Good question. The basic answer (complex answer available here) is that 0.1 has a finite representation in decimal while in binary, it has an infinite repeating representation. The computer somehow needs to fit this infinite binary representation into a 32Bit float, in order to do that, rounding of the binary representation is required. This rounding error is responsible for the strange numbers we see in our lerp output.
The IEEE 754 standard supply's an algorithm for addition, subtraction, multiplication, division and square root. These algorithms are what produces the rounding error we see. The IEEE 754 standard specifies the following formats for floating point numbers.
Single Precision floating point (32Bit)
1 Bit for the sign (positive or negative number)
8 Bits for the exponent (Information regarding decimal point position)
23 Bits for the mantissa (Significand)
Double Precision floating point (64Bit)
1 Bit for the sign (positive or negative number)
11 Bits for the exponent (Information regarding decimal point position)
52 Bits for the mantissa (Significand)
For our purposes though, we will close our eyes and imagine that the output was as we expected. Good spot though ;).
Question: Ok, so how do we use this to move objects?
Answer: In this example I will be using Vector3.Lerp to show you one method of doing just that.
Firstly we will peruse the code required to lerp an object from position 0,0,0 to 10,0,0 at 10% (0.1) intervals.
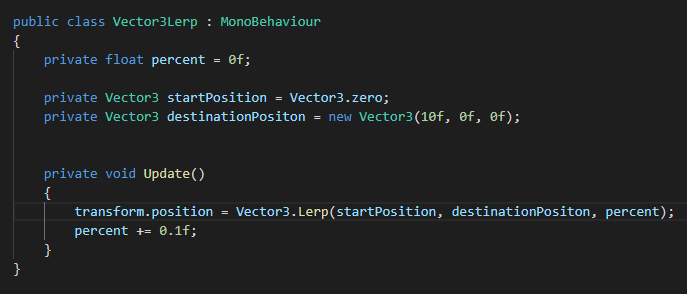
On the first line of code below the class declaration, we once again we create a percent field to hold our percentage value (0-1).
The second line creates a startPosition Vector3, which is set to 0,0,0.
The third line creates a destinationPosition Vector3, which is set to 10,0,0.
Within the Update loop, the first line of code sets the transform position (of any game object which has this class attached to it) to the return value (Vector3) from Unity's Vector3.Lerp method. Each loop we supply our startPosition, destinationPosition and percent arguments to this method.
The second line of the Update loop we simply increases the percent value by 0.1 (10%). This ensures that on the next loop we will be supplying an increased percentage value into the Vector3.Lerp method.
If we did not increase the percent value, the game object would stay at position 0,0,0 which is 0% of the distance between positions 0,0,0 and 10,0,0. As it stands now though, the game object will move 1 Unit (10% increase) to the right every Update loop.
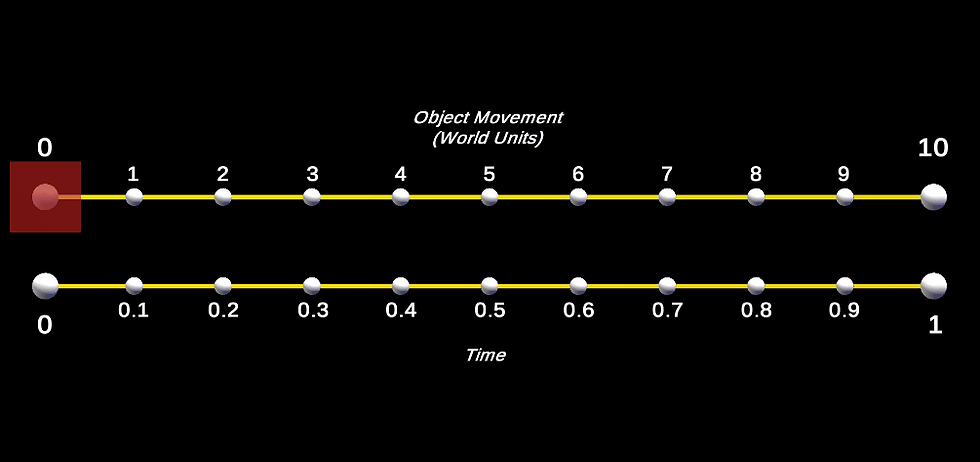
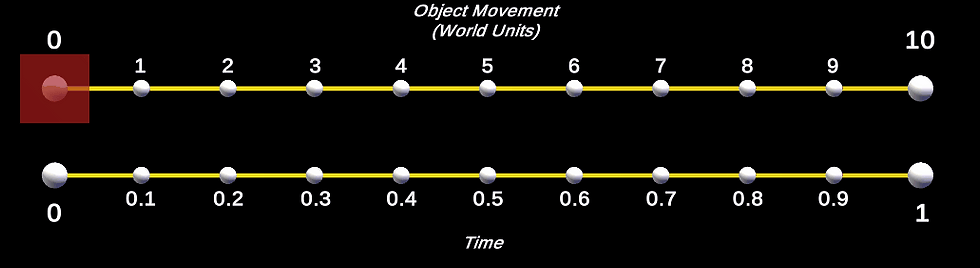
Below is a demonstration I created in Unity showing the above code running. It's worth noting that I have slowed the movement down so that each movement step is visible to the human eye.

The top line represent (in World Units) the (x) positions 0 to 10.
The red box, represents the moving GameObject.
The bottom line represents time/percent.
Here is the same demonstration not slowed down (30fps gif)

The reason the red square is moving so quickly is because every frame (update loop) we are increasing its (x) position by one movement step. If we are running at 60fps that would mean our game object would move 60 steps in 1 second. Which in this case would mean 60 units of movement in 1 second.
Question: How do you slow it down then?
Answer: Simply by supplying a smaller percentage step per frame.
At the moment we are increasing the percent variable by 0.1 (10%) each frame. If we were to change this value to say 0.01, then we would be increasing the percent variable by 0.01 (1%) per frame, hence slowing the objects movement and increasing the time it takes to reach its destination position.
Really you can use any equation or algorithm of your choice (or view my tutorial to get you started) to produce the 0-1 value required by linear interpolation. You may want to create an equation that does not increment the percent variable by a fixed amount each frame. By adding a slightly increased increment value to the percent variable (i.e.. first frame add 0.01 to percent variable, second frame add 0.02 to percent variable...eighth frame add 0.16 to percent variable...) you can achieve the effect that an object is speeding up as its journey progresses. Conversely, decrementing the percentage step per frame will give the effect that an object is slowing down during its journey.
Play around, see what you come up with...
Before I go I figured I would leave you with a very basic equation which will allow you to change the speed of a moving object by simply increasing or decreasing a speed variable. The following code shows this equation in action.
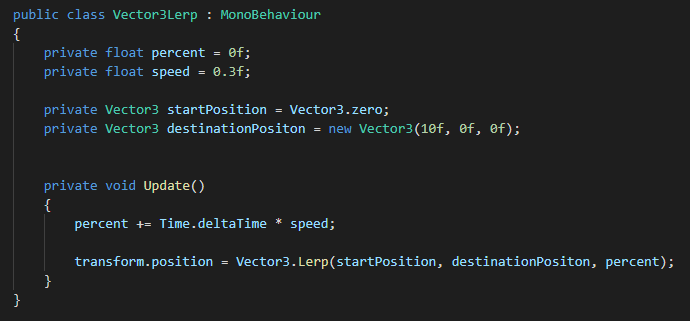
You will notice that I have added a speed variable which is multiplied by Time.deltaTime. The result of this multiplication is added to the percent variable each frame, which in turn moves the object by that percentage amount. The smaller the speed value, the slower the object moves. The greater the speed value, the faster the object moves.
Below is an example of the above code in action within Unity.
Well there we have it, as a beginner this is all you need to know about linear interpolation and how to use it in Unity with C#.
If you made it this far, well done, its pat on the back time. If you got stuck please feel free to leave a comment below and I will do my best to help you out.
In my next tutorial I will be continuing the linear interpolation theme by showing how you can use Interfaces to create your own set of lerp implementation classes. Happy days.
Until next time...
Testing 123