Using Interfaces for Linear Interpolation Implementations
- Richard Bradley
- Jul 5, 2019
- 8 min read
Updated: Aug 13, 2019
In my previous Linear Interpolation tutorial I explained what it is and how you can use it with C# code to move a game object from one position to another in a smooth motion.
In this tutorial I will be explaining how I use C# Interfaces as a template for my lerp implementations. If you have not come across Interfaces yet then I would suggest you gem up on them before proceeding.
Question: How is this going to benefit me?
Answer: It will allow you to encapsulate your lerp code into separate implementation classes.
At all times, you really want to keep your code as simple as possible. The simpler your code, the more easily you can tackle complex problems.
Implementing lerp code directly into your client class will overcomplicate things and leave a whiffy code smell. It will also destroy the cohesion of your client class as chances are it will be doing a job it's not supposed to be doing.
Encapsulation and cohesion are very good friends and are the perfect way to simply your client class, thus removing the lerp code from the client and placing it in its own cohesive class. Here I will be using Interfaces to achieve this.
It benefits us because it removes the lerp code from our client class and places it in its own separate container or class. The client class then accesses the lerp interface via its known public members. Its important to note that the client class knows nothing about the inner workings of the lerp implementation class. Infact, it knows nothing about that class at all, it only knows about the public members specified in the Interface declaration.
Question: Ok, how do I accomplish this?
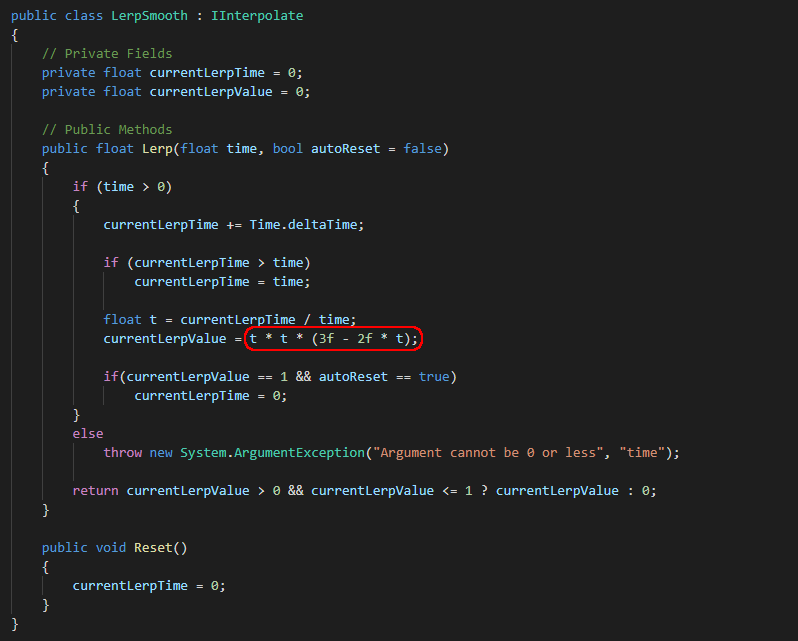
Answer: Firstly we need to create the interface. Below I have created an interface called IInterpolate with two members, Lerp and Reset.
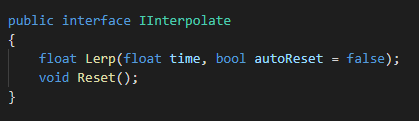
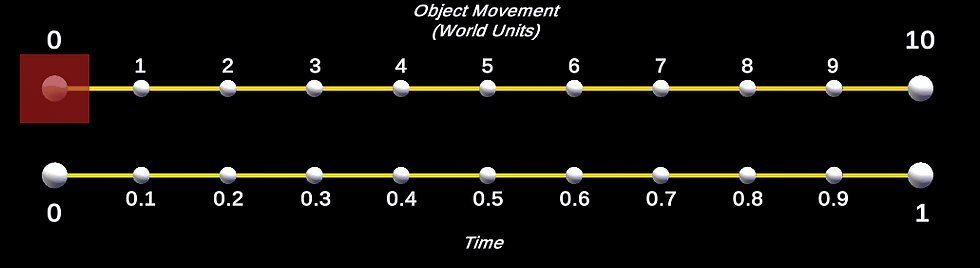
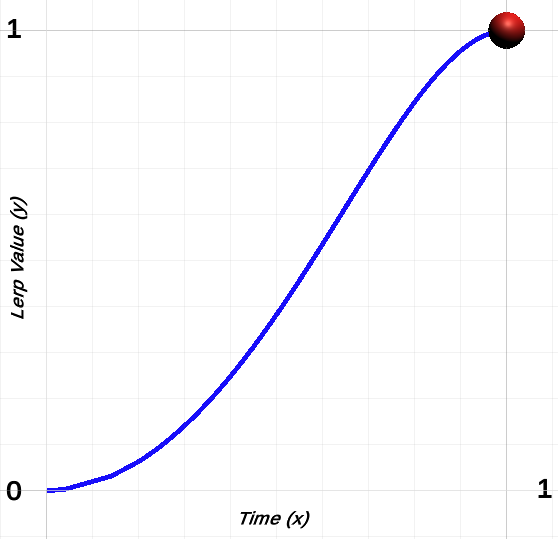
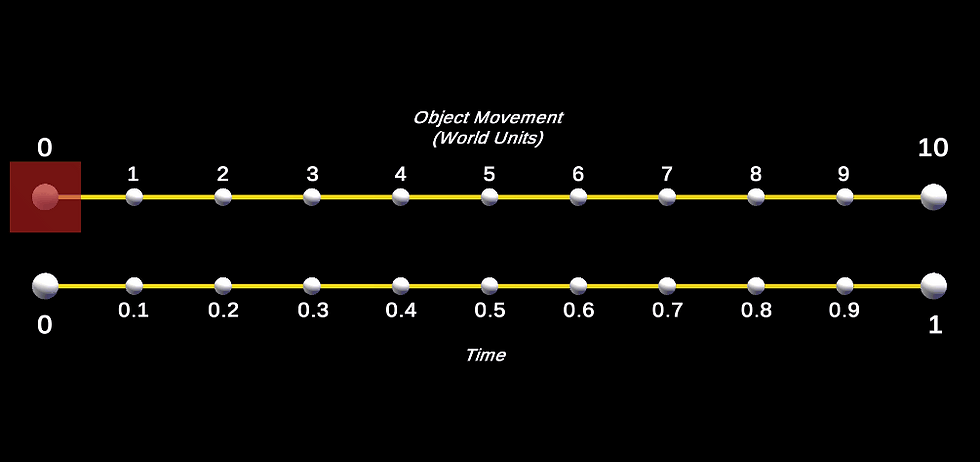
The Lerp method takes two arguments and returns a float value. The time parameter specifies the amount of time the lerp takes to complete, while the autoReset parameter (which is optional) automatically resets the lerp once it has completed. The returned float value will be between 0-1 and can be used with Vector3.Lerp as shown in my previous tutorial.
The Reset method will simply set the current lerp time to 0, effectively restarting the lerp.
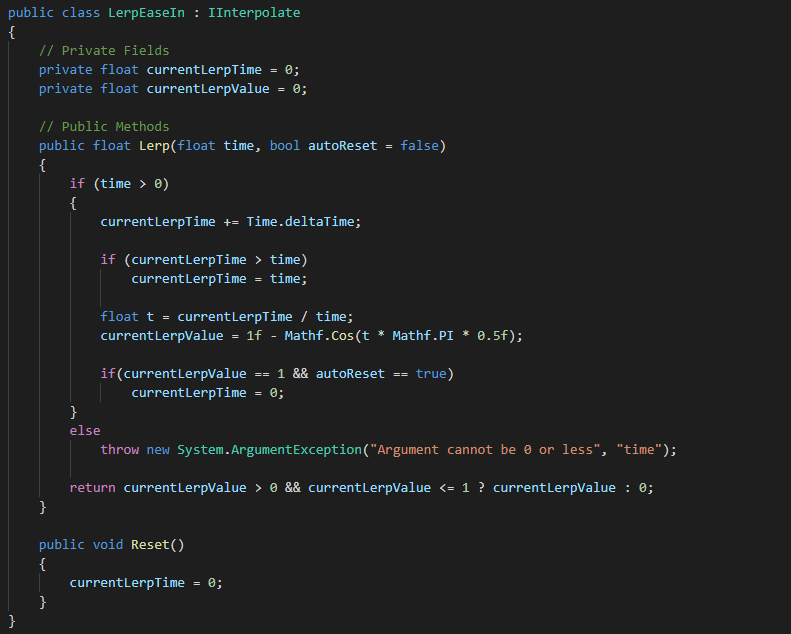
Now we have our Interface declared we need to create an implementation class which will conform to the interface 'contract' and implement the actual logic for our lerp.
Below is an example of such an implementation class.

Lets break this down.
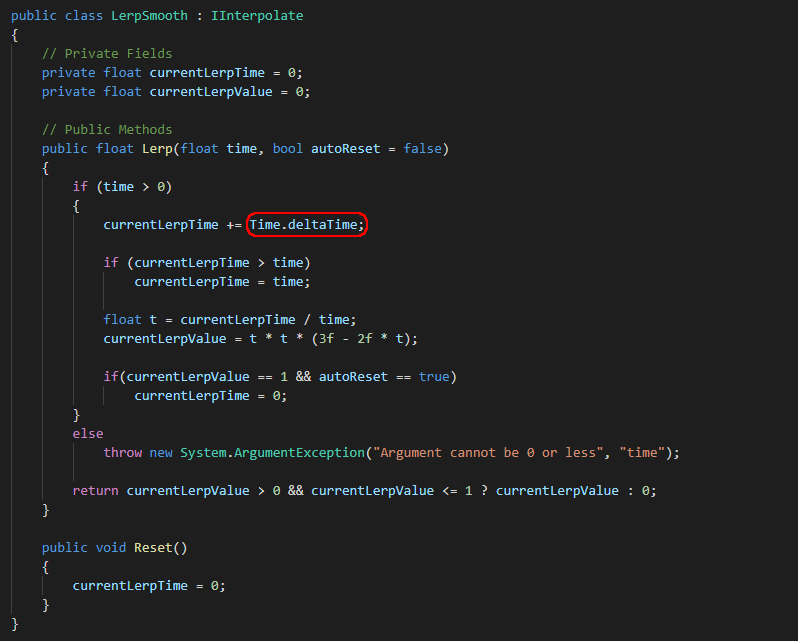
Firstly the private fields.

The currentLerpTime field is used to hold the amount of time passed since the lerp started, whilst the currentLerpValue is used to hold the 0-1 value which is returned by the Lerp method.
Now lets look at the methods.
Firstly, is important to note that because we 'inherited' from our IInterpolation interface,

we are required to implement the members specified by the interface declaration. In our case, Lerp and Reset methods.
Lets look at the Lerp method first.
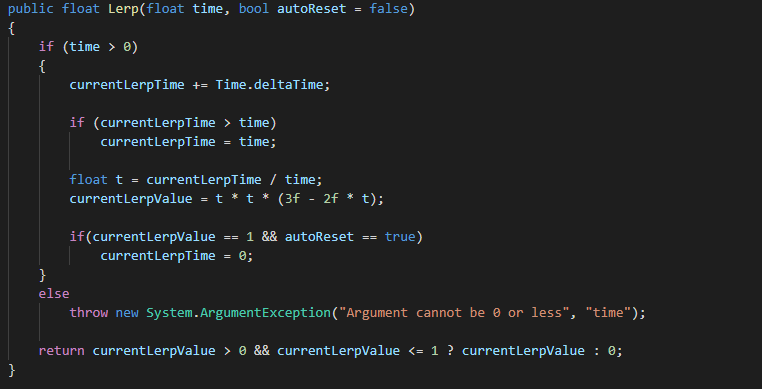
On the first line of code within the method, we check whether the time value supplied is greater than 0. If the value is less or equal to 0 then we know something is wrong therefore we throw an argument exception which will display the red text of doom in the Unity console. If the time value is greater than 0 then we know we have a valid time to work with. Although a time of 0 is valid within a lerp, it is not in this case as we divide time by currentLerpTime and dividing by 0 is never a good idea.
The next line of code simply adds deltaTime to our currentLerpTime value, which signifies the current time step.
We then check whether the currentLerpTime (calculated above) is greater than time, if it is, we set currentLerpTime to the maximum lerp time (time) value.
The next two lines of code are the algorithm used to create the 0-1 lerp value which is returned by our Lerp method. As stated in my previous Linear Interpolation tutorial, you can make up your own algorithms to create you own curved lerp value. In this example however, I have taken the formula from my rather wicked tutorial on the matter. The most important thing to note is that the currentLerpvalue holds the 0-1 lerp value after the formula has worked its magic.
The if statement below then checks whether the lerp has completed (currentLerpValue == 1), if it has, it then checks whether the we want to reset the lerp back to 0 (autoReset == true). If the client class does not supply a true value then this if statement will never be true therefore the auto reset will not take place.
Lastly we check the bounds of the currentLerpValue to make sure that something funky hasn't happened, then return it. The return value should always be between 0 and 1.
The Reset method simply resets the currentLerpTime to 0, effectively restarting the lerp from beginning.

And that is basically, that. A very simple interface implementation for a smooth Lerp.
Question: How do we make different types of lerp?
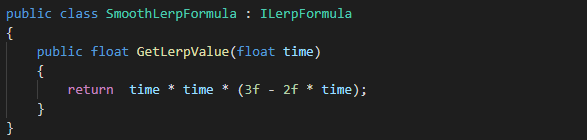
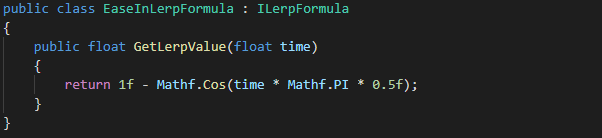
Answer: If we wanted to create more types of lerp we could simply create a new IInterpolate implementation, as shown below.
We now have two IInterpolate implementations, LerpSmooth and LerpEaseIn which our client class (Vector3Lerp) can use, as demonstrated below.
LerpSmooth
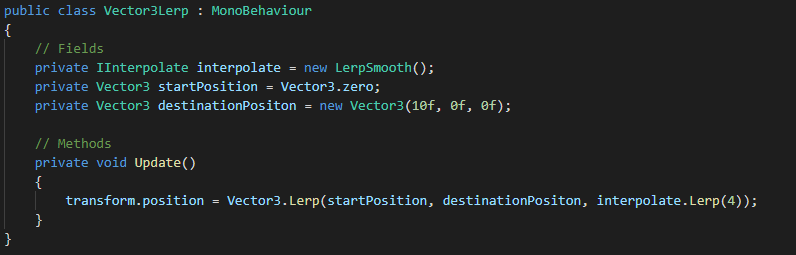

LerpEaseIn
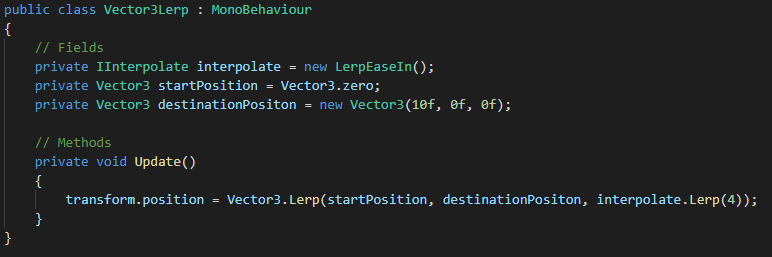
The main thing to note here is that the Vector3Lerp client class is not dependant on either LerpSmooth or LerpEaseIn, it is however dependant on the interface it's self. This means you can make as many lerp implementations as you like and switch between them in the client class. As long as the lerp implementations conform to the interface contract that is, which in our case they do as they both 'inherit' from IInterpolate and implement the required members.
Question: Wow, you the man. Anything else?
Answer: Well now that you mention it, I have some improvements you may wish to consider.
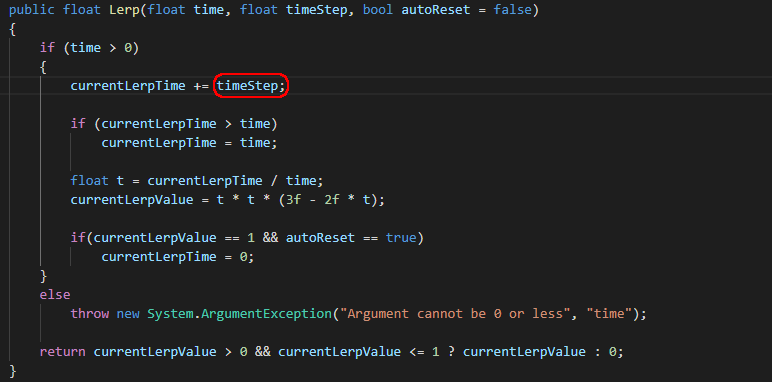
In the code below I have highlighted a potential area of improvement.
Time.deltaTime is a static class, normally it's not a great idea to tie a class down with a static dependency.
In this case however, it could be argued that this is only one implementation of the IInterpolate interface and another implementation could well use Time.smoothDeltaTime, Time.fixedDeltaTime or infact a hard coded time step value. Therefore, if you don't like the dependencies of a particular IInterpolate implementation, create another one that conforms to your specific requirements. The client class is tied to the IInterpolate interface, not its implementations.
If you do decide to take this approach I would suggest you name your implementation classes better than I have here. Something like, LerpSmoothDeltaTime, LerpSmoothDeltaTimeSmooth and LerpSmoothFixedDeltaTime etc. This will not only inform the coder that this particular implementation is dependant on the static Time class but also which deltaTime it uses.
Another way of dealing with this is to amend the interface and add a time step parameter.

Now future implementation will require the client class to send a time step value within the Lerp method.
This seems like the perfect way to do it, doesn't it?
While I agree that this is convenient there is something worth bearing in mind, what if you wanted to use Time.deltatime as the time step value?
Now that the client class is responsible for sending the time step value it will have to depend upon the static Time.deltaTime class instead, this has basically shifted the Time.deltaTime dependency to a worse place. So what do you do here?
I certainly do not like the idea of the client class having the Time.deltaTime dependency simply for this one purpose, so I would box different time step implementations into their own interface called say, ITimeStep. Now the client class would be dependant upon ITimeStep which could have multiple implementations, these implementations themselves could have dependencies and the client class would not know or care, all it knows is that it is dependant on the interface itself. ITimeStep could then replace float timestep in our parameter (in the Lerp Method) list therefore allowing it to execute the supplied ITimeStep implementation and retrieve the required value.
Of course you don't have to use an interface for this but as we are talking interfaces I figured it was fitting.
So that's one improvement to consider, now lets take look at another one.
As you might have already noticed, the only code that changes from each IInterpolate implementation is the lerp formula, the rest of the code remains the same. If we could find away to inject a formula into a lerp implementation class then we wouldn't have to copy boiler plate code for each implementation.
Lets look at some ways in which we could achieve his.
Constructor Injection
First lets create an interface called ILerpFormula.

Its a simple interface with one method that takes a float (time) and returns a float (lerp value).
With this template we can now create separate implementations, each containing our lerp formula of choice.
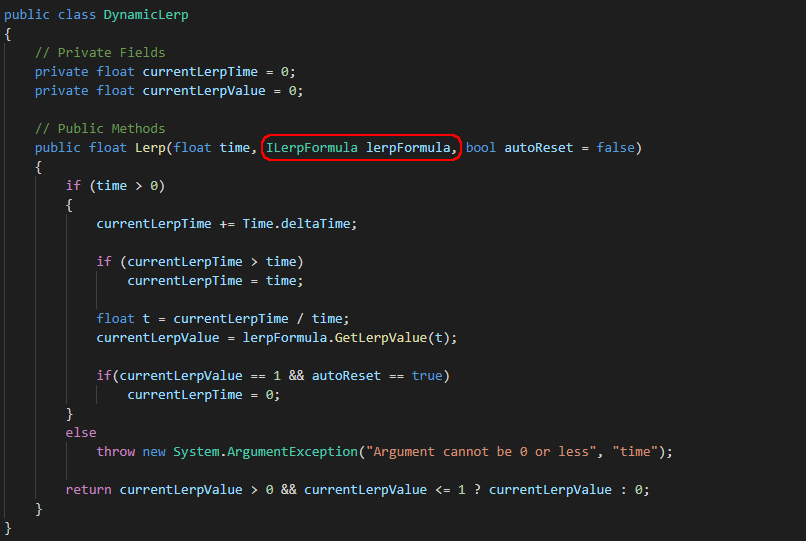
Now we have two new lerp formula's they can be injected into our new DynamicLerp class's constructor.
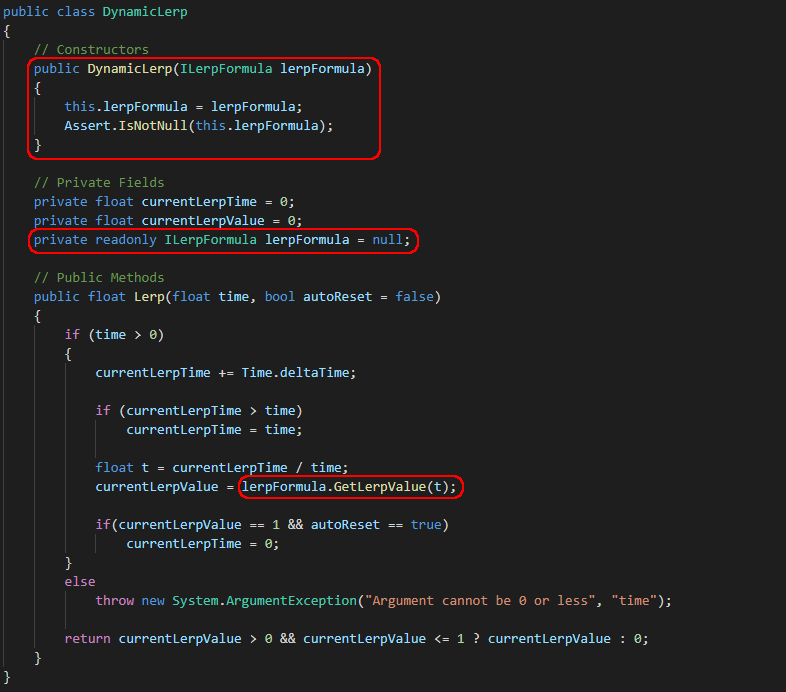
The top most red box highlights the constructor which has to be used in order to instantiate an instance of this type, forcing the coder to supply an ILerpFormula.
The second red box down highlights the added field required to hold an instance of the supplied ILerpFormula.
And the last red box highlights that we no longer hard code the lerp formula, we now rely on the supplied ILerpFormula implementation to return the lerp value.
And that is that, it is now ready to be used in our client class, as shown below.
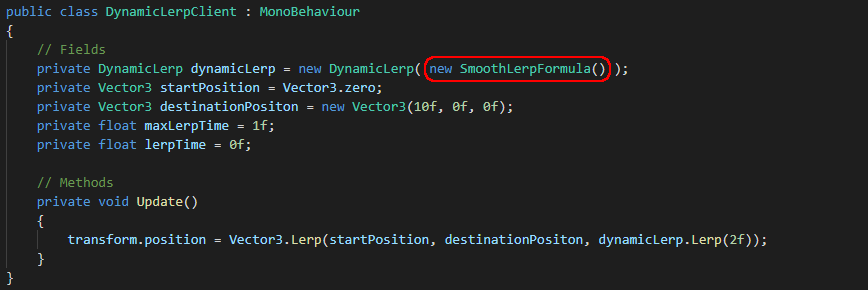
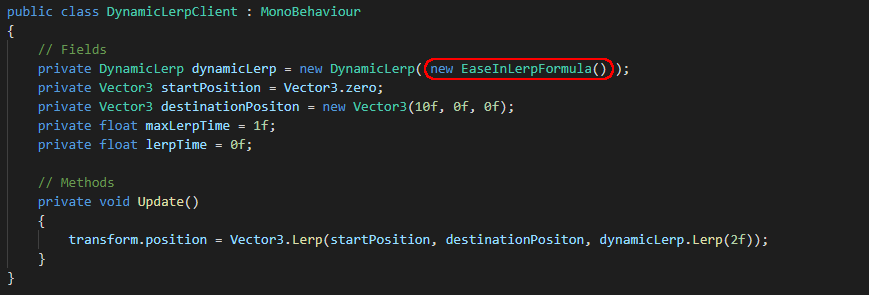
The two red boxes above both highlight Constructor Injection, you simply pass the dependency into the constructor, bingo.
One problem with this approach is that as soon as a DynamicLerp class is instantiated with a ILerpFormula dependency, it cant be changed for the duration of its life time. If you don't want the dependency to change at runtime, then its all gravy.
Method Injection
With Method Injection you simply supply the dependency within a methods parameter list, like so.
Now we no longer need a constructor to supply our class with the dependency it needs to function, as this is now taken care of by our Lerp method.
This now allows our client class to inject the dependency when accessing the Lerp method, as shown below.

This will allow the above client class to change what ILerpFormula is supplied at runtime whenever the logic dictates to do so.
This is great, however the drawback here is that we are now creating a new instance of EaseInLerpFormula every Update loop, which is a garbage collection nightmare waiting to happen. The only way around this is to cache a set of ILerpFormula implementations and pass a select one in as and when required. But do you want your client class hanging onto a set of ILerpFormula references? If not, but you still want this runtime flexibility, then Property Injection might be your bag.
Property Injection
Property Injection has the flexibly of Method Injection combined with the 'set once' nature of Constructor Injection.
Lets take a look.
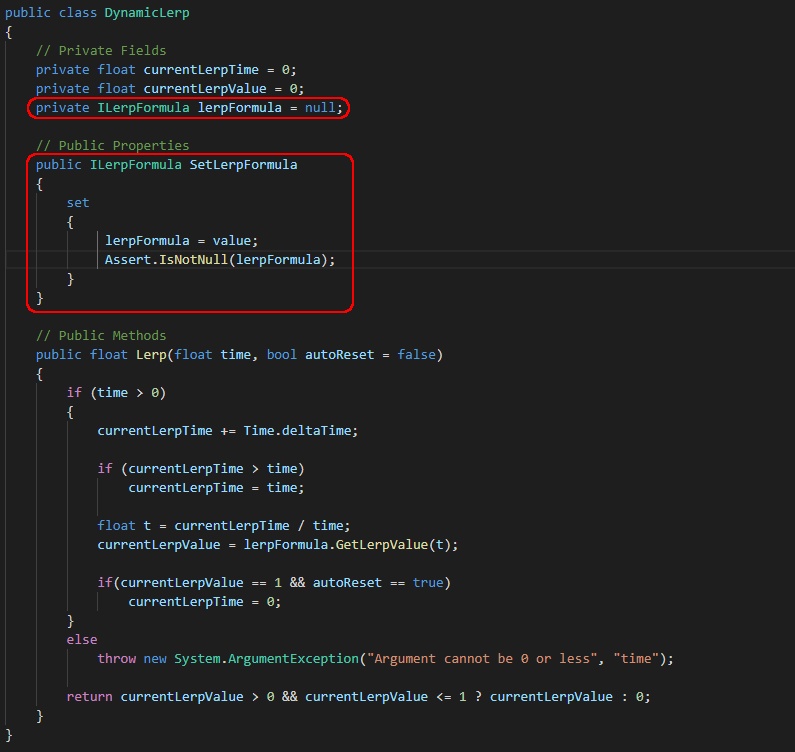
The two red boxes above highlight the creation of a public property which takes an ILerpFormula and sets it to the current active lerpFormula.
Unlike Method Injection, this assignment only needs to take place once as it is cached in the local lerpFormula variable, as shown below.
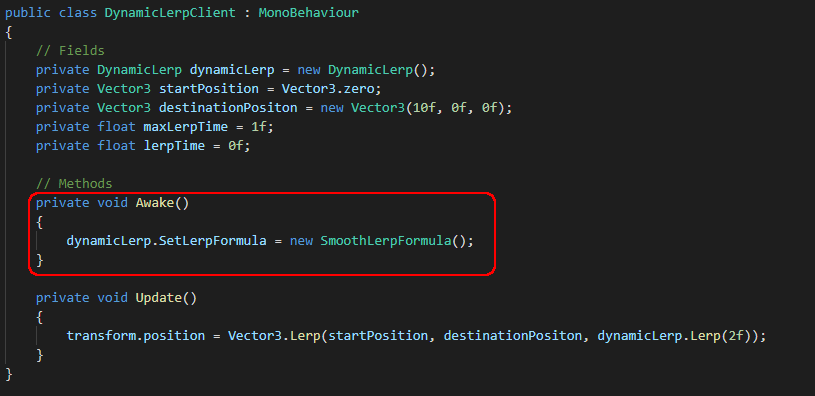
The red box highlights the creation of an Awake method which initially sets the ILerpFormula to a SmoothLerpFormula. However this assignment of an ILerpFormula can be switched any time the logic dictates at runtime. All you would need to do is supply a one off assignment to the SetLerpFormula property.
The down side to this is that a coder may forget to initially assign the SetLerpFormula property with an ILerpFormula, which of course would fire off null exception errors. A way round this would be to combine Constructor Injection with Property Injection, forcing the coder to supply a ILerpFormula implementation on instantiation but also allowing runtime swapping of the formula via Property Injection.
So there we have it, some improvements to think about and a basic demonstration of Dependency Injection.
Until next time...
Comments